Make Your Home Computer Reachable From Anywhere (No Public IP, No Router Touching) — The “Paranoid” Edition

The self-hosted, “I don’t want to trust anyone” edition: Headscale + Tailscale + NoMachine
Imagine your home computer was available to you from everywhere.
You open your laptop in a café, type one address, and you’re back on your machine at home — files, tools, servers, everything. No “did I sync that folder?” No “I’ll do it when I’m back.” You just… continue.
That’s the dream. And the moment you try to build it, you discover the old rule:
To reach a computer from the outside, it needs to be reachable from the outside.
Traditionally that means: public IP + port forwarding.
So you call your ISP and ask for “public IPv4 / remove CGNAT” or a “static IP add-on.” If they even offer it, it’s often paid, sometimes slow, and occasionally you learn the fun acronym CGNAT the hard way. Then you dig into your router settings, forward ports, open firewalls, and suddenly your “quick remote access” plan looks suspiciously like a networking side quest.
Part 1 offered the escape hatch: Tailscale + NoMachine.
- Tailscale gives your devices a private network that works from anywhere.
- NoMachine gives you a real remote desktop where typing actually feels normal.
Neither a router, nor a public IP was needed. It is set up in minutes.
And it worked — a lot of people tried it.

Then the comment section did what comment sections do: "Trust. Security. Paranoia."
- "Tailscale depends on closed-source servers."
- "How is it secure if their control plane coordinates everything?"
- "I don’t want to trust anyone with that much access."
And honestly? That’s a valid instinct.
So this is Part 2: We want the same convenience, but now we remove the biggest psychological blocker: The trust issue!
We keep the Tailscale client (because it’s excellent), we keep NoMachine (because it’s practical), but we swap the hosted coordination server for a self-hosted one:
Headscale. (In combination with Tailscale).
Why we still need Tailscale?
Headscale is in this solution only the control server (the “coordination brain”). It doesn’t create the VPN tunnels by itself.
You still need a client on each device that:
- creates the WireGuard interface,
- encrypts traffic,
- does NAT traversal/relaying,
- routes packets.
That client is the Tailscale client (or another compatible client like headscale-client alternatives in some setups, but the standard, reliable one is Tailscale).
So the relationship is:
- Headscale = self-hosted control plane (who is in the network, keys, coordination)
- Tailscale client = data plane agent on your machines (actual encrypted networking)
That’s why you use both: Headscale replaces Tailscale’s hosted server, not the client software.
The 10-second truth
- Your traffic is end-to-end encrypted either way.
- The coordination server is the control plane (device discovery/auth/key distribution), not your traffic path.
- Tailscale’s hosted coordination server is closed-source.
- Headscale lets you run your own control server.
Headscale is an open-source, self-hosted implementation of that control server.
Now: build it.
What you need
- A tiny VPS (Hetzner is perfect - any cheap one is fine, e.g. also ovh)
- A domain + a subdomain you control (we’ll use hs.mydomain.cc)
- Your home machine (Windows/Linux/macOS)
- Your travel machine (MacBook etc.)
- NoMachine on both ends (because editors, typing, clipboard)
Step 0 — DNS: make hs.doublehelix.cc point to your VPS
This is the part that silently breaks everything if it’s wrong.
0.1 Create the DNS zone in Hetzner DNS Console
In Hetzner DNS Console:
- Add a zone: mydomain.cc
- Hetzner will show you the three authoritative nameservers.
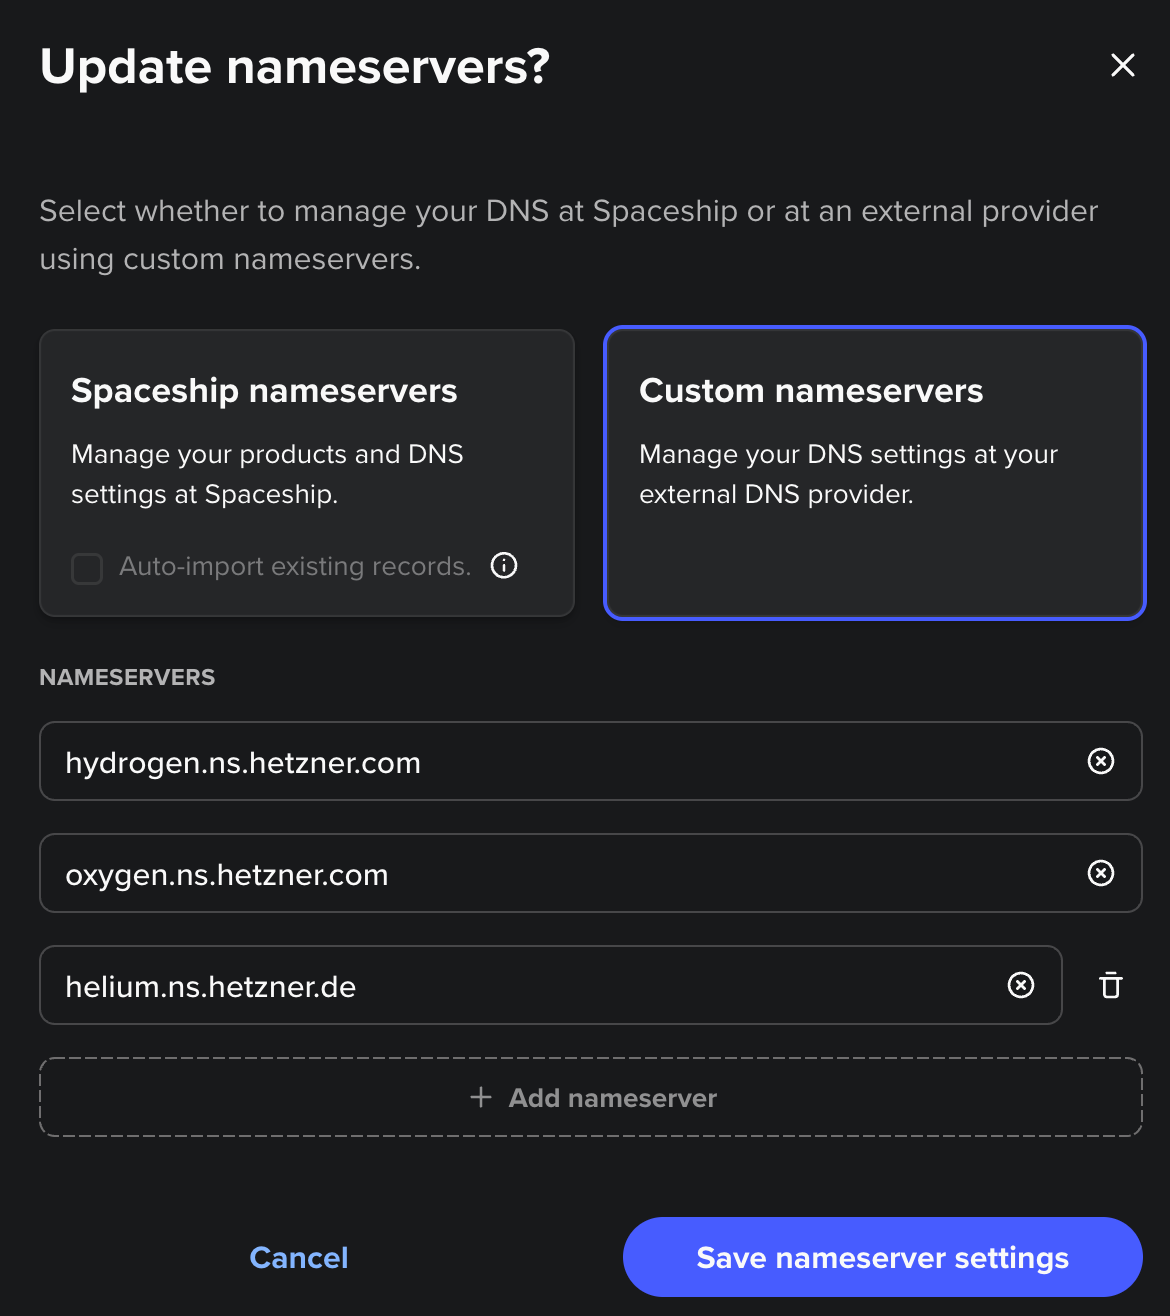
0.2 Tell your registrar to use Hetzner nameservers
At your registrar (Spaceship), set custom nameservers to the three Hetzner ones (all three).
If you skip this, Hetzner records stay “inactive” forever.

0.3 Create the A record for Headscale
In the Hetzner zone doublehelix.cc, add:
- Type: A
- Host: hs
- Value: <your VPS IPv4> (example: 2x.xx.xx.xxx)
Then verify from anywhere:
dig A hs.mydomain.cc +shortIf this doesn’t return your VPS IP, stop here and fix DNS first.
dig @1.1.1.1 A hs.mydomain.cc +short
dig @8.8.8.8 A hs.mydomain.cc +short
They should resolve your domain correctly to Hetzner's IPv4 address!
Step 1 — Put Headscale on a VPS (Ubuntu 22.04+ / Debian 12+)
Headscale’s own docs recommend installing from their official .deb packages on Debian/Ubuntu because it sets up the service/user for you.
Open this in your browser (copy/paste):
https://headscale.net/stable/setup/install/official/Install the downloaded .deb on the VPS:
sudo apt update
sudo apt install -y ./headscale_*_linux_amd64.deb
sudo systemctl enable --now headscale
sudo systemctl status headscale
Or alternatively:
Go to the headscale website - click on their link for the latest headscale package there in the website - here the newest version is v 0.28.0
HEADSCALE_VERSION="" # See above URL for latest version, e.g. "X.Y.Z" (NOTE: do not add the "v" prefix!)
HEADSCALE_ARCH="" # Your system architecture, e.g. "amd64"
wget --output-document=headscale.deb \
 "https://github.com/juanfont/headscale/releases/download/v${HEADSCALE_VERSION}/headscale_${HEADSCALE_VERSION}_linux_${HEADSCALE_ARCH}.deb"
Fill it to:
HEADSCALE_VERSION="0.28.0" #(NOTE: do not add the "v" prefix!)
HEADSCALE_ARCH="arm64" # Your system architecture, e.g. "amd64"
wget --output-document=headscale.deb \
 "https://github.com/juanfont/headscale/releases/download/v${HEADSCALE_VERSION}/headscale_${HEADSCALE_VERSION}_linux_${HEADSCALE_ARCH}.deb"
headscale.deb is downloaded.
sudo apt install ./headscale.deb

# configure (do nothing)
sudo nano /etc/headscale/config.yaml

# start process
sudo systemctl enable --now headscale

# verify everything works
sudo systemctl status headscale
Step 2 — Put HTTPS in front (Caddy, minimal)
Headscale can run without TLS and let your reverse proxy handle HTTPS.
sudo apt install -y caddyCreate /etc/caddy/Caddyfile:
So sudo nano /etc/caddy/Caddyfile:
hs.mydomain.cc {
  reverse_proxy 127.0.0.1:8080
}
Now tell Headscale its public URL and bind it locally. Edit:
sudo nano /etc/headscale/config.yamlSet (match the reverse proxy pattern from Headscale docs):
server_url: https://hs.yourdomain.com
listen_addr: 127.0.0.1:8080
tls_cert_path: ""
tls_key_path: ""
You leave tsl_cert_path and tls_key_path emtpy, because Caddy will set them automatically!
Reload:
sudo systemctl restart headscale
sudo systemctl reload caddy
(Also: VPS firewall must allow TCP 80/443.)
Quick sanity check on the VPS:
sudo ss -ltnp | egrep ':80|:443|:8080'You should see:
- Caddy listening on :80 and :443
- Headscale on 127.0.0.1:8080
Step 2.5 — Hetzner firewall: open ports (this is mandatory)
Even if UFW is “inactive,” the Hetzner Cloud firewall can still block traffic.
In Hetzner Console → Firewall rules:
- Allow inbound TCP 80
- Allow inbound TCP 443
Then from your laptop:
nc -vz hs.doublehelix.cc 443
curl -I https://hs.doublehelix.cc
If 443 doesn’t answer, Tailscale can’t talk to your control server.
Step 3 — Create a user + a join key
Create a user:
sudo headscale users create home
sudo headscale users list
Important: in your version, preauth keys want a numeric user ID.
So if users list shows something like:
ID  Name
1   home
Create a reusable key (recommended while onboarding devices) and give it enough time:
sudo headscale preauthkeys create --user 1 --reusable --expiration 720hCopy the key.
Gotcha: “authkey expired”
If you wait too long and it expires, your client will log out with authkey expired.
Just generate a new one and re-run tailscale up.
Step 4 — Join your devices to your control plane
This is where people accidentally stay on the old tailnet.
The rule:
If you previously used hosted Tailscale, you must do a clean “down” and “up” pointing to your server.
Linux (Acer)
On Linux
sudo tailscale down
sudo tailscale up --login-server https://hs.mydomain.cc --authkey <PASTE_KEY>
On macOS
sudo tailscale down
sudo tailscale up --login-server https://hs.mydomain.cc --authkey <PASTE_KEY>
On Windows (Scoop route)
Set-ExecutionPolicy -ExecutionPolicy RemoteSigned -Scope CurrentUser
iwr -useb get.scoop.sh | iex
scoop bucket add extras
scoop install tailscale
tailscale up --login-server https://hs.mydomain.cc --authkey <PASTE_KEY>
(That --login-server flow is exactly how Tailscale clients are configured for a custom control server / Headscale.)
Verify:
tailscale status
tailscale ip -4
You’ll see the familiar 100.x.y.z addresses.
Step 4.5 — DNS gotcha on client machines (the one that wastes time)
If you see:
- failed to resolve
hs.mydomain.cc - or Temporary failure in name resolution but `dig @1.1.1.1 hs.mydomain.cc` works…
…it’s your local resolver.
Linux fix (Acer)
This forces clean DNS on the Wi-Fi interface:
sudo resolvectl dns wlp1s0 1.1.1.1 8.8.8.8
sudo resolvectl domain wlp1s0 "~."
sudo resolvectl flush-caches
sudo systemctl restart systemd-resolved
sudo systemctl restart NetworkManager
macOS fix
Set DNS servers on your active network service (usually “Wi-Fi”):
sudo networksetup -setdnsservers "Wi-Fi" 1.1.1.1 8.8.8.8
sudo dscacheutil -flushcache
sudo killall -HUP mDNSResponder
After this:
dig A hs.doublehelix.cc +shortshould return your VPS IP.
Step 5 — Install NoMachine (this is the part you actually feel)
NoMachine download page:
https://www.nomachine.com/everybody/nomachine-for-your-osNoMachine uses NX on port 4000 by default.
Quick test from your laptop to the home machine:
nc -vz <HOME_TAILSCALE_IP> 4000Then in NoMachine:
- Host: <HOME_TAILSCALE_IP>
- Port: 4000
- Connect
Now editing is normal. Clipboard is normal. OAuth buttons behave. You’re not fighting X11 forwarding or Electron redraw jitter.
See Part 1 for detailed instruction how to setup and use NoMachine!
“But does this actually address the trust issue?”
It addresses the main one people argued about:
- With Tailscale hosted: you trust a closed-source coordination server.
- With Headscale: you run the coordination server yourself.
What it doesn’t remove: endpoint security is still endpoint security. Remote access is as secure as the weakest device and password.
So here are the short, practical hardening steps.
2-minute hardening (do this and sleep better)
1) Lock NoMachine to the VPN only
On Linux home machine (UFW example):
sudo ufw allow in on tailscale0 to any port 4000 proto tcp
sudo ufw deny 4000/tcp
On Windows: allow port 4000 only from Tailscale range 100.64.0.0/10 (Advanced Firewall GUI works too).
2) ACLs: deny-by-default
Start with: only your laptop can reach your desktop (4000) and SSH (22). Not full mesh.
3) Account security
Strong passwords + 2FA where possible. Most compromises are “account got popped,” not “WireGuard broke.”
You now have the same “home computer from anywhere” setup as Part 1 — but with the coordination server under your control.

I might soon work out a Docker version of this. But if you don't want Docker running in the Hetzner server, then this article's setup will do it for you!
A lot of thanks and warm greetings to Horst Herb for pointing to the security solution with Headscale and Tailscale!!
Happy remote computing — including for the paranoid members amongst us!
Troubleshooting in 90 seconds (5 checks that catch 95% of failures)
1) Does DNS resolve on the client?
On Linux/macOS client:
dig A hs.doublehelix.cc +short
dig @1.1.1.1 A hs.doublehelix.cc +short- If
@1.1.1.1works but the first one is empty → your local resolver is broken/stale (see “DNS fixes” below).
2) Is HTTPS reachable from the client?
nc -vz hs.doublehelix.cc 443
curl -I https://hs.doublehelix.cc | head
If this fails, it’s almost always Hetzner Cloud firewall (80/443 not open) or DNS pointing to the wrong IP.
3) Is Caddy actually listening on the VPS?
On the VPS:
sudo ss -ltnp | egrep ':80|:443|:8080'You want:
caddyon:80and:443- headscale on
127.0.0.1:8080
4) Are you actually on your Headscale network (not the old Tailscale one)?
On each device:
tailscale status
tailscale ip -4
If devices don’t see each other, do a clean re-join:
sudo tailscale down
sudo tailscale up --login-server https://hs.mydomain.cc --authkey <NEW_KEY>
5) “authkey expired” (common)
On the VPS, create a new key (reusable + long enough for onboarding):
sudo headscale users list
sudo headscale preauthkeys create --user <ID> --reusable --expiration 720h
DNS fixes (the two “same bug, different OS” solutions)
Linux (systemd-resolved) — fixes SERVFAIL / empty
dig
sudo resolvectl dns wlp1s0 1.1.1.1 8.8.8.8
sudo resolvectl domain wlp1s0 "~."
sudo resolvectl flush-caches
sudo systemctl restart systemd-resolved
sudo systemctl restart NetworkManager
macOS — fixes “can’t resolve” after Tailscale changes DNS
sudo networksetup -setdnsservers "Wi-Fi" 1.1.1.1 8.8.8.8
sudo dscacheutil -flushcache
sudo killall -HUP mDNSResponder
(Optional, if you want Tailscale not to touch DNS on macOS):
sudo tailscale set --accept-dns=falseHetzner firewall reminder (the silent blocker)
Even if ufw is inactive, Hetzner Cloud firewall rules can block traffic before it reaches your VPS.
Minimum inbound rules in Hetzner Console:
TCP 80TCP 443